
Granny Square Blanket Pattern (Free Pattern)
There’s nothing that will light up a room quite like a super colorful crochet blanket. I’ve crocheted dozens of blankets over the years, but this one still makes me so happy every time I see it!
Inspired by a modern, larger than life take on the classic granny square, each block starts in the round, gradually forming a square. The result is a bold and playful design, creating a beautifully finished piece. Perfect for cozy projects.

Skill Level
- Intermediate
Finished Size
Approxametly 62 x 87 inches (158 x 221 cm)
Materials
- Red Heart Super Saver Jumbo Yarn (396g/14oz Worsted Weight #4) - 10 colors, 1 skein of each color
- Color A - Pretty n pink
- Color B - Dark Orchid
- Color C - Spring Green
- Color D - Turqua
- Color E - Cherry red
- Color F - Minty
- Color G - Orchid
- Color H - Blue
- Color I - Pumpkin
- Color J - Bright yellow
- 6mm (J) Crochet hook
- Scissors
- Tapestry Needle (yarn needle)
Stitch Key (U.S. Terms)
- mc - magic circle
- sl st - slip stitch
- ch - chain
- sc - single crochet
- hdc - half double crochet
- dc - double crochet
- dc2 cluster - double crochet 2 cluster
- tr - triple crochet
- tr2 cluster - triple crocher 2 cluster
Special stitches
Detailed instructions for the stitches below:
- dc2 cluster - 2 double crochets worked together in same stitch
Yarn over, insert hook into stitch, pull up a loop, yarn over, pull through 2 loops (do not complete stitch). Repeat in same stitch. Yarn over, pull through all loops on hook.
- tr2 cluster - 2 triple crochets worked together in same stitch
Yarn over twice, insert hook into stitch, yarn over and pull up a loop, (yarn over, pull through 2 loops) twice (do not complete stitch). Yarn over twice, insert hook into same stitch, yarn over and pull up a loop, (yarn over, pull through 2 loops) twice. Yarn over and pull through all 3 loops on hook.
Video Tutorial
Follow along with the full video tutorial below:
Color Placement Notes
Each square is made using all 10 colors, with one color used per round. To create a balanced, colorful blanket, the order of colors is rotated for each square
Colors are listed in the Materials section above and are referenced here as Color A-J. Refer back as needed when following each square layout.
- For this blanket, crochet the following squares and arrange them as shown in the layout below.
- The first color listed for each square corresponds to Round 1, with each subsequent color used for the following rounds.
-
- Square 1: A, B, C, D, E, F, G, H, I, J (make 4)
- Square 2: E, I, F, H, C, G, J, A, D, B (make 4)
- Square 3: J, C, G, E, F, H, I, D, B, A (make 4)
- Square 4: D, A, H, F, B, I, G, C, J, E (make 4)
- Square 5: H, D, I, B, J, A, C, E, G, F (make 4)
- Square 6: F, E, B, C, I, J, H, G, A, D (make 3)
- Square 7: G, J, D, I, A, F, C, B, E, H (make 3)
- Square 8: C, H, E, A, D, B, J, I, F, G (make 3)
- Square 9: I, G, A, J, B, D, E, H, F, C (make 3)
- Square 10: B, F, J, G, C, E, D, A, H, I (make 3)
 Pattern
Make 35 squares total.
- This blanket is constructed using a join-as-you-go method. Complete one full square first. Each subsequent square is joined during the final round. If preferred, squares may also be joined using a different method after all squares are complete.
- The beginning chain in each round counts as a stitch (chain amount will vary by round).
- Fasten off at the end of each round.
Granny Square
Round 1: Begin with a magic circle. Ch 4 (counts as tr), work 11 tr into circle. Join with a sl st to top of beginning ch-4. (12 sts)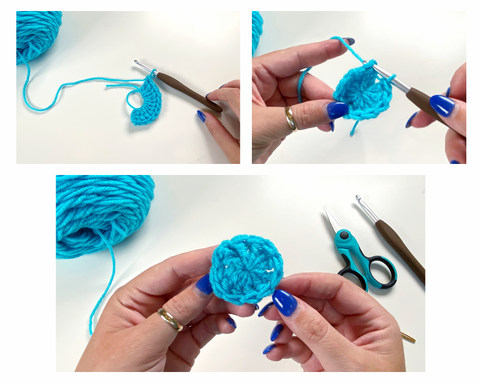
Round 2: Join next color in any space between stitches. Ch 2, work 1 tr in same space (beginning tr2 cluster), ch 3. *Work tr2 cluster in next space, ch 3; repeat from (*) around. Join with sl st to top of beginning tr2 cluster. (12 tr2 cluster groups)

Round 3: Join next color in any ch-3 space. Ch 3 (counts as dc), work 2 dc in same space, ch 2. *Work 3 dc in next ch-3 space, ch 2; repeat from (*) around. Join with sl st to top of beginning ch-3. (12 dc groups)

Round 4: Join next color in any ch-2 space. Ch 3, work 1 tr in same space (beginning tr2 cluster), ch 2, work tr2 cluster in same space, ch2. *In next ch-2 space, work (tr2 cluster, ch 2, tr2 cluster, ch 2); repeat from (*) around. Join with sl st to top of beginning tr2 cluster. (12 groups)

Note: Round 5 begins shaping the square by forming corners.
Round 5: Join next color in any ch-2 space between tr2 cluster groups. Ch 4 (counts as tr), work 2 tr in same space
*Work 3 dc in each of the next 5 ch-2 spaces. In next ch-2 space, work (3 tr, ch 2, 3 tr) to form corner. Repeat from (*) around to last corner.
Work 3 tr, ch 2 in same space as beginning. Join with a ss to top of beginning ch-4).

Note:
- Each of the following rounds will increase evenly along the sides to maintain the square shape.
- If using the join-as-you-go method, squares are joined during the final round (Round 10).
Rounds 6-10: Join next color in any corner space. Ch 3 (counts as dc), work 2 dc in same space.
*Work 3 dc in each space between clusters across to next corner. In corner, work (3 dc, ch 2, 3 dc). Repeat from (*) around.
Finish final corner with 3 dc, ch 2, then join with sl st to top of beginning ch-3.

Join-As-You-Go Method
Squares are joined during the final round (Round 10) using a join-as-you-go method.
Tip:
- For easiest assembly, begin in one corner of the blanket and work across in rows, joining squares as you go from side to side.
- You can work all squares up to Round 9 first, then join them during Round 10 as you assemble the blanket.
Step 1:
Joining along one side
Work Round 10 as written until reaching the first corner.
Instead of working ch 2 in the corner, insert hook into the corresponding corner of the completed square and work a sl st to join. Ch 1, then complete the corner with 3 dc in the same space.
Continue along the side as follows:
- Work 3 dc in next space of current square
- Insert hook into corresponding corner of the completed square and sl st to join
Repeat this across the side, joining each space as you go.
Joining between two squares
When joining a square between two completed squares, work Round 10 as established, joining along the first side as described above.
When you reach the corner where completed squares meet, insert hook into the shared corner of the adjacent square and work a sl st to join. Ch 1, then complete the corner with 3 dc in the same space.
Continue working along the next side, joining each space to the second completed square as established.
Step 2: Continue as normal
After joining along all required sides, continue working the remainder of Round 10 as written.
Border
Optional: Add a border as follows:
Round 1:
Join yarn in any corner. Ch 3 (counts as dc), work 2 dc in same space.
*Work 3 dc in each space across. At joins between squares, work (dc in next space, dc2tog across the join, dc in next space). Continue across to next corner. In corner, work (3 dc, ch 2, 3 dc). Repeat from (*) around. Work 3 dc, ch 2 in beginning corner. Join with a sl st to top of beginning ch-3.
Note: One color is used per round for a total of 10 border rounds.
Rounds 2-10:
Join yarn in any corner space. Ch 3 (counts as dc), work 2 dc in same space.
*Work 3 dc in each space across to next corner. In corner, work (3 dc, ch 2, 3 dc). Repeat from (*) around.
Finish final corner with 3 dc, ch 2, then join with sl st to top of beginning ch-3.
